


Quilling blog
Paper Quilling for Beginner: 4 Easy Steps to Stunning Art

Jul
Paper Quilling for Beginner: 4 Easy Steps to Stunning Art
Welcome to the wonderful world of paper quilling for beginners! Paper quilling is a relaxing, low-cost paper craft where you roll and shape thin strips of paper into beautiful designs. Before you start your first DIY quilling project, you’ll need to gather a few simple tools. In Part 1 of this beginner’s guide, we’ll walk through every essential quilling tool — what it does and why you need it — so you can set up your workspace with confidence.
Part 1: Essential Tools – Paper Quilling for Beginners

A quilling needle is the most essential tool for any quilling project. It has a small slot in the center that holds the end of your paper strip so you can scroll and roll it into tight coils. Quilling needles come in different sizes to match different paper strip widths, so beginners may want a small set to start with.
💡 Pro Tip Smaller the needle slot, nicer the quilled curves

Pointed tweezers help you pick up, shape, and place your paper strips precisely where you want them. Choose a fine-point pair — they give you far more control and make detailed quilling designs much easier to assemble.
💡 Pro Tip Becareful not to drop the tweezer, bend point head will slow you down
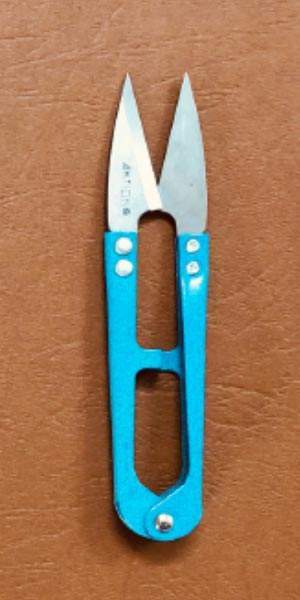
A thread snip (or small clipper) is a handy tool for cutting paper strips to the exact length you need. Regular scissors will work too, but a thread snip is faster and saves your hands a lot of effort during longer projects.
💡 Pro Tip You should pick the high quality snip. Bad quality snip with loose head might cut your fingures.

White glue is the perfect adhesive for paper quilling. This water-based glue is made for paper, dries clear, is easy to clean up, and gives your finished piece a neat result. Stick with white glue for the best outcome
💡 Pro Tip Picking the right glue is essensial for your quilling quality

A pointed nail file is an optional but useful tool for spreading a thin, even layer of white glue on your crafting board. A slim glue line keeps your strips clean and stops glue from messing up your design — a small detail that makes a big difference.

A crafting board made of clear plastic, acrylic, or mica gives you a smooth surface for spreading glue. If you like, you can even add shaped holes to help you form consistent quilling shapes.
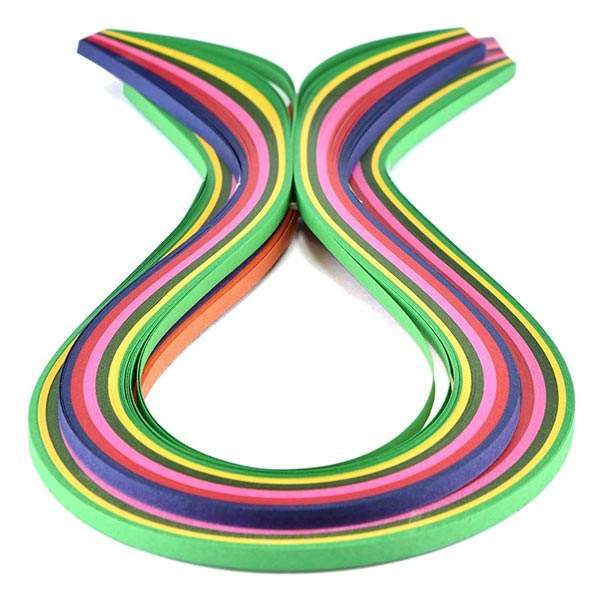
Quilling paper strips are, of course, the heart of every project, making them the most important element to understand when diving into paper quilling for beginner projects. Pick a range of colors that suit your design, and pay attention to strip width—different projects call for different thicknesses. Popular starting widths are 2 mm and 5 mm: the smaller the design, the thinner the strip you’ll want, and vice versa.
💡 Pro Tip The thickness and weight of the strip are incredibly important for successful paper quilling for beginner experiences. Paper that is too light is hard to craft with and easily scratched or damaged when rolling. On the other hand, paper that is too thick won’t give you nice, smooth quilled curves. The ideal weight for paper strips, depending on the paper type, is from 120gsm – 150gsm.
💡 Pro Tip When practicing paper quilling for beginner techniques, keep in mind that a smaller paper width makes the crafting process harder, but it delivers a much nicer, higher-quality final result.
Frequently Asked Questions About Tool Paper Quilling for Beginner
You can easily improvise your own quilling needle. As long as the tool has a small center slot and a stable handle to grip, it will work. Two easy options:
Option 1: The Sewing Needle Hack (Most Durable)
- Create the slot: Take a standard sewing needle and use wire cutters to snip off the very top loop of the needle’s eye. This transforms the eye into a tiny, two-pronged fork.
- Create the handle: Push the sharp point of the needle securely into a wine cork, a pencil eraser, or a small wooden dowel so it’s easy to hold. It must be perfectly placed in the middle of the handle.
- Glue the needle and the handle together with hard glue
Option 2: The Toothpick Trick (Fastest Setup)
-
Create the slot: Take a sturdy wooden toothpick and use a craft knife or utility blade to carefully slice a small, shallow slit directly down the center of one end.
(*) Safety Tip: Take extra care when cutting metal needles or using sharp blades on toothpicks. Always cut away from your body!
Option 3: Buy a Ready-Made Slotted Tool (Most Convenient)
If DIY isn’t your style, buying a professional tool online is incredibly inexpensive and saves you the prep work.
- What to search for: Look for a “slotted quilling tool” or a “quilling needle tool.”
- Why it’s worth it: They usually cost just a few dollars, feature comfortable ergonomic handles, and have perfectly uniform metal slots that make rolling much smoother and faster for beginners.
- Where to find them: You can easily grab them on Amazon, Etsy, or any online craft supply store—often as part of a cheap beginner kit that includes paper strips too!
When you’re first starting out, accuracy is everything. Incorporating pointed tools—like fine-tip tweezers or a pointed nail file—into your setup is a total game-changer because they offer ultimate precision.
Here is why they are absolutely worth having on hand:
- Flawless Placement: A fine tip allows you to pick up, manipulate, and place delicate paper strips exactly where they belong without crushing or warping your carefully rolled shapes.
- Easy Glue Clean-up: Glue smudges are a common beginner hurdle. A sharp point lets you easily scrape away or tidy up excess glue from tight corners and tiny crevices before it dries.
- Micro-Adjustments: These tools act as an extension of your fingers, giving you total control over tiny details that would otherwise be frustratingly difficult to handle.
💡 Pro Tip: Keep a damp paper towel nearby to wipe the tips of your tweezers or nail file frequently. Dried glue buildup on your tools will make the paper strips stick to them instead of your project!
While buying pre-cut, ready-made strips is a massive timesaver, making your own is a fantastic fallback when you need a custom color or run out of supplies mid-project.
Here is how to cut your own strips cleanly and efficiently:
The Essential Tools
- A sharp craft knife (or utility blade): Dull blades will chew or fray the edges of your paper.
- A long metal ruler: Avoid plastic rulers, as the knife can easily slice into them and ruin your straight edge.
- A cutting mat: To protect your table and keep your paper from sliding.
Step-by-Step Cutting
-
Measure and Mark: Use a pencil to lightly mark your desired width (e.g., 3 mm or 5 mm) at the top and bottom of your paper sheet.
-
Align and Secure: Anchor your metal ruler firmly along those marks.
-
Slice with Even Pressure: Hold the ruler down tightly with one hand, and draw your craft knife steadily along the edge.
⚠️ A Quick Pro-Tip on Speed: You might see advice suggesting you fold your paper into 3 or 4 layers to cut multiple strips at once. Don’t do this! Folding creates permanent creases in the paper, which will completely ruin your smooth quilled curves.
Instead, if you want to speed things up, tightly stack 3 or 4 separate sheets of paper on top of one another, tape the edges down to your cutting mat so they don’t shift, and slice through the stack together!
When it comes to paper quilling, the adhesive you choose makes a massive difference in how neat and durable your final piece looks. While there are dozens of options on the craft market, standard white craft glue (PVA glue) is by far the best choice.
Why White Glue is the Gold Standard
Standard white craft glue or tacky glue is preferred by quillers of all skill levels because it offers the perfect balance of features:
- Dries Completely Clear: Even if you accidentally use a little too much, it won’t leave an ugly yellow or shiny residue behind once it dries.
- The Perfect Drying Speed: It sets up quickly enough to hold your rolled paper shapes in place, but stays wet long enough for you to make micro-adjustments.
- Strong, Flexible Bond: Because it is water-based, it slightly penetrates the paper fibers, creating a permanent bond that won’t snap or crack later.
What Else Can You Use in a Pinch?
If you don’t have standard white craft glue on hand, you can temporarily substitute it with:
- Clear Liquid School Glue: It works similarly to white glue, though it tends to be a bit more watery, which can cause thin quilling paper to warp if you use too much.
- Tacky Glue: A thicker version of white glue. It grabs the paper almost instantly—which is great for standing 3D elements—though it gives you less time to reposition your strips.
⚠️ Glues to Avoid: Absolutely steer clear of glue sticks (they are too clumpy and impossible to use precisely) and hot glue guns (the glue is far too thick, creates messy strings, and will instantly ruin delicate paper curves).
The backing paper is the foundation of your entire artwork. If you choose a backing that is too flimsy, the moisture from the glue will cause the whole project to buckle and bend.
- The Best Choice: Heavy Cardstock (200 gsm – 300 gsm). This is thick enough to hold the weight of dozens of glued paper strips without warping.
- Alternative Options: Canvas boards, watercolor paper, or shadowbox backings work beautifully.
- What to Avoid: Standard printer paper or thin construction paper. They will instantly wrinkle the second they touch liquid craft glue.
Part 2: Paper Quilling for Beginner, how to do quilling craft
Now that you’ve gathered your tools in Part 1, it’s time for the fun part of paper quilling for beginners: actually rolling and shaping your paper strips. In this guide we’ll walk through how to roll a basic quilling coil step by step, how to glue your shapes onto a blueprint, and a few handy tricks to get clean, consistent results. Don’t worry if your first few attempts look uneven — practice really does make perfect with this craft!
Step 1: Print a Free Quilling Blueprint
Before you slide your first strip of paper into a rolling tool, you need a roadmap. Printing out a free quilling blueprint (also called a template) is the secret to keeping your design perfectly symmetrical, organized, and stress-free while you learn.
To ensure a smooth first experience, keep these tips in mind:
- Keep it Simple: For your very first project, choose a minimalist pattern with large, basic shapes (like a simple flower, heart, or monogram letter) rather than an intricate, detailed landscape.
- Guide Your Placement: The blueprint shows you exactly where to place each coil, taking the guesswork out of sizing and spacing.
💡 Pro Tip: Don’t glue your project directly onto your printed template! Place a sheet of wax paper or clear plastic wrap over your printed blueprint and tape it down. This lets you build your design perfectly over the guide lines without accidentally gluing your beautiful artwork to the printer paper.

Quilling printing template example 1 – Paper Quilling for Beginner

Quilling printing template example 2 – Paper Quilling for Beginner

Quilling printing template example 3 – Paper Quilling for Beginner

Quilling printing template example 4 – Paper Quilling for Beginner
Step 2: How to quill

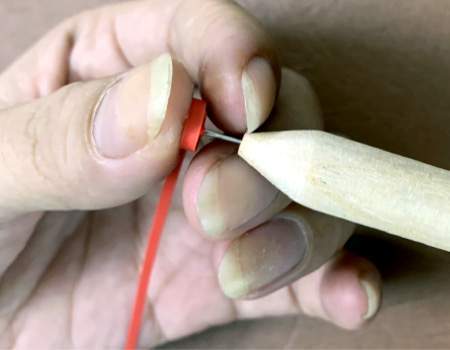
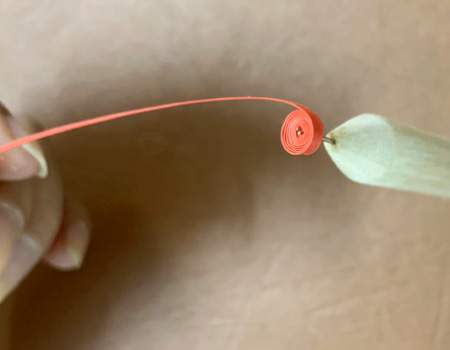
1 – Insert the Paper Into the quilling needle
Now it’s time to load your needle. This step requires a bit of fine-motor control, but after a few tries, it will feel like second nature!
- Steady Your Tool: Hold your quilling needle firmly in your dominant hand, keeping the slotted tip stable and level.
- Pinch and Align: With your other hand, gently pinch the very end of your paper strip between your thumb and index finger.
- Slide it In: Carefully slide the edge of the paper into the tiny metal slot, keeping the paper perpendicular to the tool so it rolls straight.
💡 Pro Tip for a Perfect Center: When threading the paper, don’t let the strip stick out past the other side of the slot too much. Leaving just a microscopic sliver of paper peeking through—rather than a long flap—prevents an ugly, bulky crease and gives the center of your coil a much cleaner, professional look.
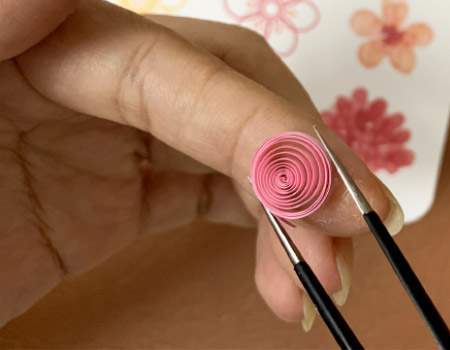
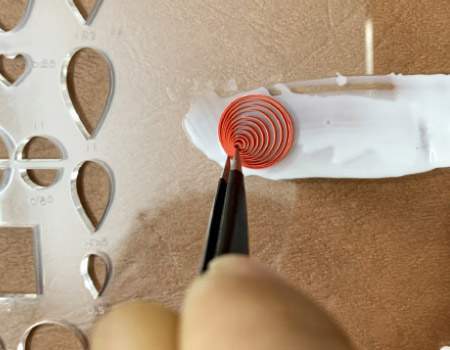
2 – Roll the Paper Coil
With your paper securely slotted, it’s time to start rolling. The goal here is to find a steady rhythm and keep your movements smooth and even.
- Twist the Tool: Rotate the handle of your quilling tool continuously. As you spin the needle, the paper strip will begin wrapping tightly around itself.
- Guide the Edges: Use the thumb and index finger of your free hand to lightly pinch the top and bottom edges of the growing coil (just like in the photo). This acts as a guide, keeping the paper perfectly aligned so it doesn’t spiral outward into a messy cone shape.
- Finish the Strip: Keep rolling with smooth, steady pressure until the entire length of the paper strip is wound around the tip of your tool.
💡 Pro Tip on Tension: Finding the right amount of pressure takes a little trial and error. If you roll too tightly, the paper builds up massive tension and might snap, tear, or refuse to shape later. If you roll too loosely, the coil will unravel into a floppy mess. Aim for a firm but gentle grip—after 3 or 4 practice runs, your fingers will naturally find the perfect sweet spot!
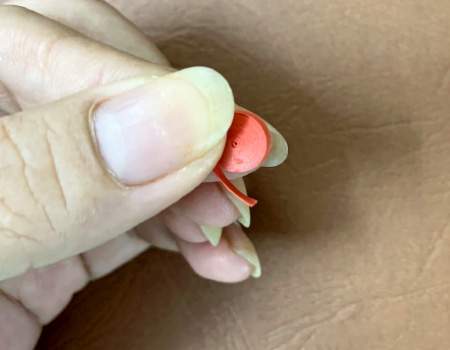
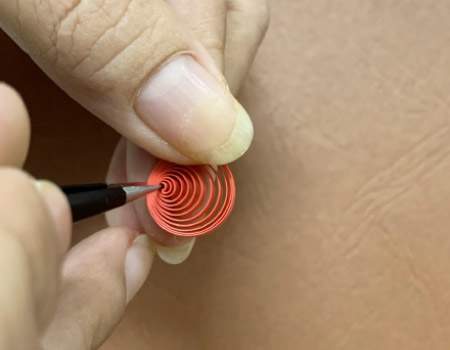
3 – Remove the Coil From the Tool
Once you reach the end of your paper strip, the next step is safely transferring your freshly rolled coil off the metal needle without disrupting its shape.
- Support the Base: Place your index finger at the base of the needle, right underneath the rolled coil.
- Pinch and Guide: Gently catch the flat top and bottom faces of the coil with the thumb and index finger of your opposite hand to keep the layers from sliding apart.
- Push Straight Off: Using a smooth, steady motion, push upward from the base of the needle and slide the coil completely off the tool.
⚠️ Pro Tip: Watch the Center! Be incredibly gentle during this transition. A common beginner mistake is twisting or pulling the coil unevenly as it leaves the needle, which accidentally yanks out the inner core. Keep your grip light but secure, and make sure you slide the coil straight up to keep the center neat, flat, and flush.
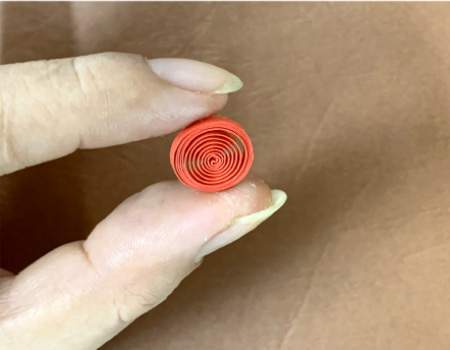
4 – Maintain a Secure Grip
Now that the coil is free from the needle, do not let go just yet! Keeping control of the paper at this exact moment is crucial for the next stage of your design.
- Hold Firmly: Keep the coil pinched securely between your thumb and index finger.
- Prevent Unraveling: If you release your grip too quickly, the built-up tension will cause the paper to instantly snap open and unravel, forcing you to start rolling all over again.
- Prepare Your Next Move: Keeping a steady hold gives you time to decide whether you want to glue this into a permanent tight coil, or place it into a template board to let it expand into a loose coil.
💡 Pro Tip on Coil Size: The final size of your coil is determined entirely by the length of your paper strip. Want a larger circle? Use a full-length strip. Need a tiny, delicate detail? Simply snip your paper strip shorter before you start rolling!
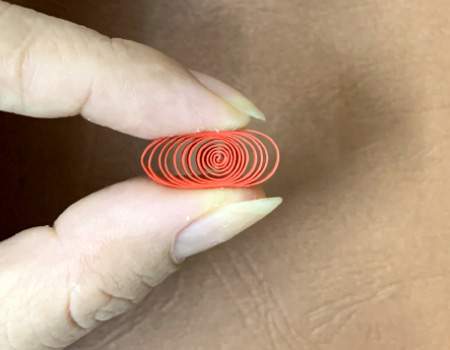
5 – Expand the Coil to Size
If your design calls for a soft, fluid shape—like a leaf, petal, or wave—you will want to transform your tight roll into a loose coil. This step is all about controlled relaxation.
- Relax Your Grip: Slowly ease the pressure between your thumb and index finger, allowing the natural spring-tension of the paper to gently unfurl the layers outward.
- Control the Size: Do not let go completely! Keep your fingers lightly framing the perimeter of the coil so you can pinch it shut the exact moment it reaches your desired size.
💡 Pro Tip for Even Spacing: Take your time during this transition. Letting the paper expand slowly and steadily ensures that the spaces between each ring stay perfectly uniform. If you let it pop open too quickly, the inner core will stay tightly jammed together while the outer rings get completely loose and floppy!
6 – Shape Your Coil
This is where the real magic happens! A simple loose circle can be transformed into almost any design element just by changing how you manipulate it. You can do this entirely by hand, or use a specialized template board for perfect geometric precision.
Method A: Shaping by Hand (Pinch for Points)
Use your thumb and index finger to firmly pinch the outer edge of the loose coil. This compresses the paper layers and creates a sharp, crisp corner.
- Teardrop: Pinch the coil in just one spot. This is the go-to shape for flower petals and raindrops.
- Marquise (Eye/Leaf Shape): Pinch the coil on two opposite sides at the same time.
- Square or Triangle: Pinch the coil in three or four evenly spaced spots around the perimeter.
Method B: Using a Shaping Board (Optional for Perfect Geometry)
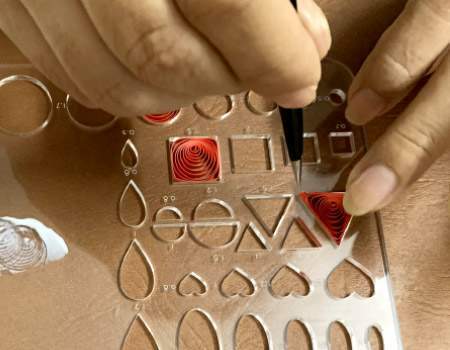
If you want absolutely flawless, uniform geometric shapes (like the squares, triangles, and hearts shown in the photo), utilizing a plastic shaping board is a lifesaver.
- Drop the Coil In: Place your loose, unglued coil directly into the desired shape mold on the board.
- Guide into the Corners: Use a fine-tipped tool, like a quilling needle or tweezers, to gently push and guide the paper coils into the sharp corners of the mold.
- Pinch to Set: Once the paper has adapted to the mold’s shape, carefully pinch the corners to set the creases permanently before removing it.
💡 Pro Tip for Perfect Symmetry: If you are making a project that requires multiple identical shapes—like a symmetrical geometric mandala or a flower with five matching petals—the shaping board guarantees that every single piece comes out identical in size and angle, giving your final artwork a highly professional look!
Great work! You now know how to roll a basic quilling shape. Remember, practice makes perfect — don’t be discouraged if your early shapes aren’t pretty, because they’ll improve quickly. Next, let’s learn how to glue them onto your blueprint.
Step 3: How to Glue Your Quilling Shapes
Once your paper shapes are perfectly rolled and pinched, the final stage is securing them to your design. To keep your artwork pristine and completely free of messy, wet blobs, you need to master the art of the “glue pool.”
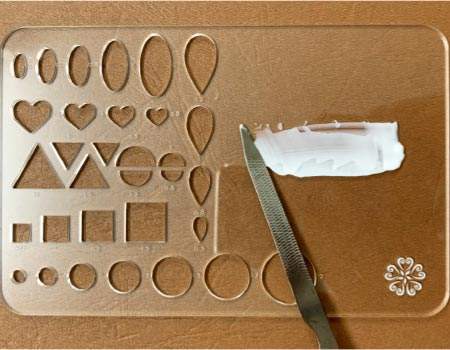
1 – Spread a Thin, Even Layer
Instead of squeezing glue directly from the bottle onto your delicate paper strips, create a controlled dipping station right on your crafting board.
- Dispense a Small Amount: Squeeze a small dollop of white craft glue onto a flat, non-porous section of your plastic board.
- Spread it Thin: Use a flat, pointed tool—like the metal nail file shown in the photo—as a palette knife to scrape and spread the glue out into a perfectly smooth, paper-thin layer.
- The Goal: You want a shallow film of glue. This micro-layer ensures that when you dip your paper shapes later, they only pick up the absolute minimum amount of adhesive needed to stick.
💡 Pro Tip: Wondering why a plastic crafting board is perfect for this? White PVA glue cannot permanently bond to smooth plastic. Once your session is over and the leftover glue dries completely, you can simply peel it right off the board like a sticker, leaving your workspace completely clean!
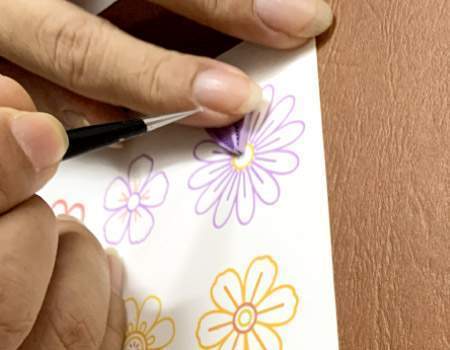
2 – Pick Up Your Shape with Tweezers
Moving your delicate paper shape to the glue station requires a steady hand. Fingers are often too bulky and can easily crush or distort the concentric rings, which is why a pair of pointed tweezers is essential for this step.
- Secure Your Grip: Slide your tweezers around the outer walls of your shaped coil (as shown in the top photo). Grip it firmly enough to hold all the paper layers together, but gently enough that you don’t dent or crimp the edges.
- Lift Straight Up: Lift the shape cleanly off your workspace. Keep your movements smooth and vertical to prevent the delicate layers from sliding out of alignment.
⚠️ Crucial Rule: Shape Before You Lift! Always make sure you are completely finished expanding, pinching, and finalizing the form of your paper coil before you pick it up. Trying to alter or adjust the shape while holding it with tweezers will almost always warp its symmetry or pop the inner core right out of the center.
3 – Dip the Shape Into the Glue
Now, bring your gripped shape over to the thin glue film you prepared on your crafting board. The key here is applying just enough adhesive to stick, without drowning the paper.
- Keep it Flat: Lower the paper shape completely flat and parallel into the glue film. You want every bottom edge of the paper coils to touch the adhesive at the exact same time.
- A Light Tap is All It Takes: Gently press the shape down into the glue. Do not push it all the way to the bottom of the board—you just want to skim the surface so a microscopic layer of glue clings to the bottom edges.
- Steady Your Grip: As shown in the photo, you can rest your index finger lightly near the tip of the tweezers to stabilize your hand and prevent any accidental shaking.
💡 Pro Tip: Check Before You Place! Lift the shape straight up out of the glue and flip it over to check the bottom. If you see thick webs or big droplets of white glue stretching between the rings, it’s too much! Lightly tap the shape onto a clean, dry section of your scrap paper or a damp paper towel to blot away the excess before moving it to your final project.
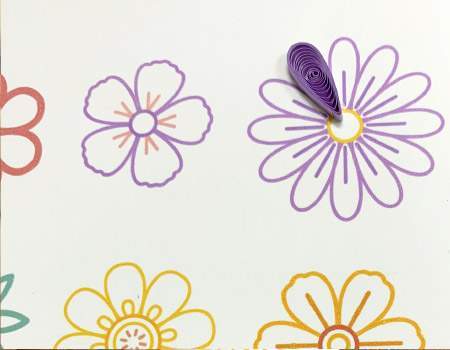
4 – Place and Set Your Shape
With a micro-layer of glue on your paper coil, it’s time to bring your design to life on your blueprint or background cardstock.
- Align Your Placement: Hover your tweezers directly over the template outline. Lower the shape straight down onto the paper so the glue doesn’t smear sideways upon contact.
- Press Gently: Release the tweezers and use your index finger (or the clean tip of a nail file) to press down lightly and evenly on the top of the coil. This ensures all the bottom edges make full contact with the backing paper.
- Let It Bond: Hold the shape in place for 1 to 3 seconds. Because the glue film is so thin, it will tack up and anchor your shape almost instantly!
💡 Pro Tip for Success: Work efficiently during this step! A microscopic layer of glue dries incredibly fast when exposed to open air. Move smoothly from your glue dipping station straight to your blueprint so the adhesive doesn’t skin over and dry out before it touches your project.
Simply repeat this rolling, shaping, and gluing process piece-by-piece until your beautiful handmade creation is complete!
Essential Tricks Paper Quilling for Beginners
To wrap up your introduction to this beautiful craft, keep these golden rules in mind. They will help you skip the common beginner frustrations and get clean, professional results from day one:
- Lean on Your Crafting Board: Your template board is your absolute best friend for consistency. Whether you are creating different-sized circles, crisp teardrops, or sharp triangles, always use the board’s molds. This guarantees that matching elements are identical in size, making your overall design look balanced and uniform.
- Less is Always More with Glue: Keep your glue layers paper-thin. Heavy blobs will warp your quilling strips, wrinkle your background cardstock, and leave an unwanted shiny residue behind.
- Maintain Steady Pressure: Focus on a smooth, rhythmic rolling motion. Avoid pulling the paper too aggressively or letting your grip go loose mid-roll. Consistency in your hands leads to consistency in your paper.
- Be Patient with Yourself: Paper quilling is entirely based on muscle memory. If your first few shapes look a little uneven or wonky, don’t worry! Every single strip you roll builds your confidence and fine-tunes your technique.
🌸 Enjoy the Rhythm: Take your time, embrace the creative process, and have fun watching a simple strip of paper transform into stunning art. Happy quilling!
Thank you for your support of our products and content. Please help us share this with our community.